Boxer74
New member
I just finished my weekend project of installing the Jekill & Hyde exhaust on my R18 and since I could only find limited threads, I am posting my experience. During the 7 months of owning the bike, I have surprisingly loved almost every aspect of it, but for the exhaust. Cool looking bike with a BMW sewing machine exhaust. The J&H is what should have come with the bike from the factory in my opinion. The wide open exhaust setting is deep and throaty but with a push of a button, you can silence it and sneak into the garage without waking the neighbors. Best of all, everything is hidden and looks very OEM.
Total time from order to deliver was 14 days. Impressive given each exhaust is custom fabricated and shipped from the Netherlands. The communication, packaging, and craftsmanship is A+. Supplied directions are an A-, but hopefully the notes below will assist other in the couple of spots I needed help. Total install time took about five hours. If I had to do it all over again, I think I could cut that in half. I really wish I owned a bike table to lift the bike up and work in a comfortable position. That would have made a world of difference. Having all the necessary tools ahead of time would also have saved many trips to the basement. So let's start there.
Tools
Torx sockets in 25,30,40,45,50
10mm & 13mm socket
3mm & 5 mm allen wrench
Breaker bar (to remove the four OEM bolts that hold the OEM exhaust support in place. There have Loctite on them from the factory.
Rubber mallet (used to pound off the OEM exhaust)
Torque wrench
Blanket to lay/sit on the floor unless you have a bike table.
What I learned
- Remove the factory heat shields secure by two torx bolts. Each OEM exhaust pipe is held on by a single C clamp, but it doesn't slide off. You need to pound it off and in order to do that you need to remove the heat shield.
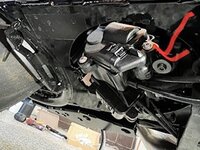
- Installing the servo motors threw me and I emailed Steeve at J&H on a Saturday for help. He called me within minutes. To me the directions were not clear on how to attached the servos to the bike. Steeve sent me a pic of the bolt to remove and explained that once the bolt is removed, you need to pull down on the plastic and slip the servo tab between the engine and the plastic then re-insert the bolt you just removed. Below is a picture of the bolt you need to remove. Makes sense now.
- Removing the four OEM T50 bolts that secure the exhaust support is a pain, especially on the LH side because the bolts are under the big, they are big, and Loctited in. There isn't much room to play with the shifter. I could see the probability of stripping one of these bolts as moderate. The RH side is easier because the bike is leaning in the opposite direction and there is no shifter. Still, this was the biggest pain of the project.
- The wiring was a breeze and took about 30 minutes. The button on the handlebar is easy to pop on and I snaked the wire through the existing OEM hole in the handlebar so it is concealed. Alternatively, you could zip tie it to the outside.
I could only start it up in the garage as it is 15 degrees out, but it makes me smile. Below are a couple pics of the process and to show where I ran into questions. I hope this is of some value to the next install.


Total time from order to deliver was 14 days. Impressive given each exhaust is custom fabricated and shipped from the Netherlands. The communication, packaging, and craftsmanship is A+. Supplied directions are an A-, but hopefully the notes below will assist other in the couple of spots I needed help. Total install time took about five hours. If I had to do it all over again, I think I could cut that in half. I really wish I owned a bike table to lift the bike up and work in a comfortable position. That would have made a world of difference. Having all the necessary tools ahead of time would also have saved many trips to the basement. So let's start there.
Tools
Torx sockets in 25,30,40,45,50
10mm & 13mm socket
3mm & 5 mm allen wrench
Breaker bar (to remove the four OEM bolts that hold the OEM exhaust support in place. There have Loctite on them from the factory.
Rubber mallet (used to pound off the OEM exhaust)
Torque wrench
Blanket to lay/sit on the floor unless you have a bike table.
What I learned
- Remove the factory heat shields secure by two torx bolts. Each OEM exhaust pipe is held on by a single C clamp, but it doesn't slide off. You need to pound it off and in order to do that you need to remove the heat shield.
- Installing the servo motors threw me and I emailed Steeve at J&H on a Saturday for help. He called me within minutes. To me the directions were not clear on how to attached the servos to the bike. Steeve sent me a pic of the bolt to remove and explained that once the bolt is removed, you need to pull down on the plastic and slip the servo tab between the engine and the plastic then re-insert the bolt you just removed. Below is a picture of the bolt you need to remove. Makes sense now.
- Removing the four OEM T50 bolts that secure the exhaust support is a pain, especially on the LH side because the bolts are under the big, they are big, and Loctited in. There isn't much room to play with the shifter. I could see the probability of stripping one of these bolts as moderate. The RH side is easier because the bike is leaning in the opposite direction and there is no shifter. Still, this was the biggest pain of the project.
- The wiring was a breeze and took about 30 minutes. The button on the handlebar is easy to pop on and I snaked the wire through the existing OEM hole in the handlebar so it is concealed. Alternatively, you could zip tie it to the outside.
I could only start it up in the garage as it is 15 degrees out, but it makes me smile. Below are a couple pics of the process and to show where I ran into questions. I hope this is of some value to the next install.