Slotheadslim
Active member
I'm diving in to see if I can replace the front directionals on my R18 Classic with Motogadget M-Blaze Pin directional LEDs. I ended up purchasing them from Revival Cycles in Austin Texas, https://revivalcycles.com/collectio.../products/motogadget-m-blaze-pin-turn-signals. I had no prior experience with them and I have no financial interest in them. Their prices were the same as everyone else but all the online comments showed they had good support so I thought I'd try them out. I had a question if the tubular current management device that appears in their pictures as attached to the wiring was still part of the model of the M-Blaze pin they sell. Other websites that sell this LED said they were redesigned by Motogadget without this tube making the installation easier. I called Revival up and they said the current regulation device is now built into the pin which is good because the old tube regulator wouldn't have fit for me. I placed my order with them that morning and it was in the mail that night. I received the order only a few days later so I'm happy I used them.
What I'm trying to do:
- Remove the front LED directionals on the R18 Classic, keep the auxilary lights in place and replace the OEM directionals with the M-Blaze pin. I like the M-Blaze pin since it is visible 180 degrees, so not only is light being directed to the front but I should be able to see it too. I like the idea of being able to see which directional is lit and the R18 only shows one instrument cluster light indicating the directional is on but it doesn't show which one. This change would take care of that issue..
- Make the process as reversible as possible since my state, Massachusetts in the US, might fail my inspection next year because they aren't DOT lights. I already asked the local inspection station and there is a good possibility they'll fail me. I need to be able to undo the install if I am rejected, install the OEM directionals, get the bike re-inspected and reinstall the M-Blaze pins later if needed with minimal effort.
Some facts:
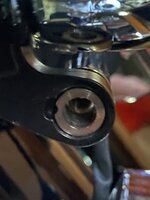
- The metal bracket that holds the OEM directionals is hollow and has an opening underneath it where your can run wires.
- If you remove the Torx screw on the end of the bracket the OEM directional comes off. You can remove the wire clip to it with a screwdriver easily.
- The auxilary light is held in place from rotating by a small pin that sticks out of the directional base. You want to be sure to hold the auxilary light when removing the OEM directional so the light doesn't spin forward or backwards unexpectedly and smash into your front forks. (See the attached picture of the base to see the pin on the OEM directionals and where it is inserted at the base of the auxilary lights)
- The Torx screw is an M8, the same size as the Motogadget M-Blaze Pin threads so the pin screws right in.
- TodkaVonic was nice enough to share with me information on the OEM male clip for the directionals. It is from a Mini Cooper washer spray nozzle wire and he send me an Ebay link to it. I found out the part number is 61662755722 02-16 R5X. I was able to purchase it on Ebay from Allmag Autoparts. (See the attached pictures)
- If you go to BMW Motorcycles website and look at the OEM LED Flashing turn indicator front instructions, you can see the pin they use to keep the auxilary lights from rotating. (See the two attached images from their instructions and the picture I attached with the pin circled in red.)
- The connectors are too large to fit in the M8 opening so I need to run the wires from the M-Blaze pin through the bracket first and attach the connector on the other side. Unfortunately this arrangement keeps me from easily reversing the setup later without unsoldering the wires from the connector or removing crimping. Other ideas about how to make this wiring easier to reverse are very welcome.
The Plan
- Remove the front directional bolt on the end of the bracket holding the auxilary lights. Remove the directional and remove the clip for the directional wires.
- Add something to the bracket base to act as a pin to make sure the auxilary lights don't rotate forwards or backwards unexpectedly or fall off the bracket.
- Add some type of locknut or washer to the M-Blaze pin to help secure it to the bracket when it's tightened.
- Run the wires from the M-Blaze through the end of the bracket.
- While leaving extra wire, trim it shorter because you get almost 40" of wire.
- Attach the wire from the M-Blaze pin to the male clips. I plant to use TICONN solder seal waterproof butt splice connectors I got from Amazon (see the attached image).
- Turn on the bike and make sure I don't get any error codes and confirm the M-Blaze pins work as expected.
- Add lock tight blue to the M-Blaze pin threads, tighten them down being careful to direct the light forward.
- Use electrical tape and wire ties to secure the wires.
Questions I have:
- It isn't clear what I can use as a pin to insert in the base of the auxilary lights to stop them from rotating? I've thought about cutting down a nail from a picture hanger but that offers no corrosion/rust resistance. Maybe a galvanized nail might work? Any other ideas? A nail should work well because it will stop it from going in too far into the bracket opening because of the nail head.
- Since the end of the M-Blaze pin is attaching to the bracket, I can't use the supplied nut to tighten it. I have to tighten the M-Blaze pin by hand. I'm thinking of using lock tight blue and maybe some type of lockwasher. Does anyone have any recommendations of what I should use for a lock washer or other ideas of how best to lock it in place while making it removable later if needed without the risk of messing up the pin? There are many choices for lock washers.
I've attached a picture of the M-Blaze pin attached to the right turn signal location. You can see it against the left side which still has the OEM directional attached.
Tom


What I'm trying to do:
- Remove the front LED directionals on the R18 Classic, keep the auxilary lights in place and replace the OEM directionals with the M-Blaze pin. I like the M-Blaze pin since it is visible 180 degrees, so not only is light being directed to the front but I should be able to see it too. I like the idea of being able to see which directional is lit and the R18 only shows one instrument cluster light indicating the directional is on but it doesn't show which one. This change would take care of that issue..
- Make the process as reversible as possible since my state, Massachusetts in the US, might fail my inspection next year because they aren't DOT lights. I already asked the local inspection station and there is a good possibility they'll fail me. I need to be able to undo the install if I am rejected, install the OEM directionals, get the bike re-inspected and reinstall the M-Blaze pins later if needed with minimal effort.
Some facts:
- The metal bracket that holds the OEM directionals is hollow and has an opening underneath it where your can run wires.
- If you remove the Torx screw on the end of the bracket the OEM directional comes off. You can remove the wire clip to it with a screwdriver easily.
- The auxilary light is held in place from rotating by a small pin that sticks out of the directional base. You want to be sure to hold the auxilary light when removing the OEM directional so the light doesn't spin forward or backwards unexpectedly and smash into your front forks. (See the attached picture of the base to see the pin on the OEM directionals and where it is inserted at the base of the auxilary lights)
- The Torx screw is an M8, the same size as the Motogadget M-Blaze Pin threads so the pin screws right in.
- TodkaVonic was nice enough to share with me information on the OEM male clip for the directionals. It is from a Mini Cooper washer spray nozzle wire and he send me an Ebay link to it. I found out the part number is 61662755722 02-16 R5X. I was able to purchase it on Ebay from Allmag Autoparts. (See the attached pictures)
- If you go to BMW Motorcycles website and look at the OEM LED Flashing turn indicator front instructions, you can see the pin they use to keep the auxilary lights from rotating. (See the two attached images from their instructions and the picture I attached with the pin circled in red.)
- The connectors are too large to fit in the M8 opening so I need to run the wires from the M-Blaze pin through the bracket first and attach the connector on the other side. Unfortunately this arrangement keeps me from easily reversing the setup later without unsoldering the wires from the connector or removing crimping. Other ideas about how to make this wiring easier to reverse are very welcome.
The Plan
- Remove the front directional bolt on the end of the bracket holding the auxilary lights. Remove the directional and remove the clip for the directional wires.
- Add something to the bracket base to act as a pin to make sure the auxilary lights don't rotate forwards or backwards unexpectedly or fall off the bracket.
- Add some type of locknut or washer to the M-Blaze pin to help secure it to the bracket when it's tightened.
- Run the wires from the M-Blaze through the end of the bracket.
- While leaving extra wire, trim it shorter because you get almost 40" of wire.
- Attach the wire from the M-Blaze pin to the male clips. I plant to use TICONN solder seal waterproof butt splice connectors I got from Amazon (see the attached image).
- Turn on the bike and make sure I don't get any error codes and confirm the M-Blaze pins work as expected.
- Add lock tight blue to the M-Blaze pin threads, tighten them down being careful to direct the light forward.
- Use electrical tape and wire ties to secure the wires.
Questions I have:
- It isn't clear what I can use as a pin to insert in the base of the auxilary lights to stop them from rotating? I've thought about cutting down a nail from a picture hanger but that offers no corrosion/rust resistance. Maybe a galvanized nail might work? Any other ideas? A nail should work well because it will stop it from going in too far into the bracket opening because of the nail head.
- Since the end of the M-Blaze pin is attaching to the bracket, I can't use the supplied nut to tighten it. I have to tighten the M-Blaze pin by hand. I'm thinking of using lock tight blue and maybe some type of lockwasher. Does anyone have any recommendations of what I should use for a lock washer or other ideas of how best to lock it in place while making it removable later if needed without the risk of messing up the pin? There are many choices for lock washers.
I've attached a picture of the M-Blaze pin attached to the right turn signal location. You can see it against the left side which still has the OEM directional attached.
Tom


")


