Akrapovic Sport Mufflers

Howdy folks

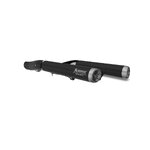
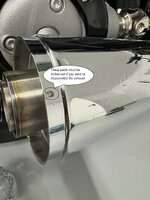
picking up an R18 with these pipes on it. It says in the blurb "but also to gain power, weight, torque and sound." Anyone got the figures on this? I take it the ECU makes the required AFR changes within it's scope. Is that correct?

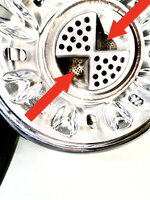
And the big one.... what do they sound like? Is there an agreed way to de-restrict these even more than stock? You know, highly technical ways like hole saws and hacksaws?

Welcome any feedback from your experiences.
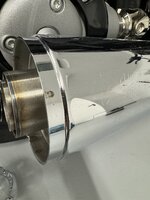
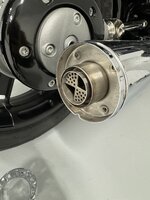
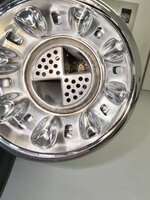
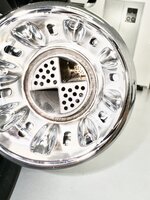
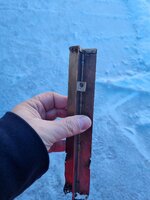
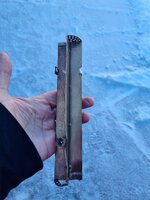
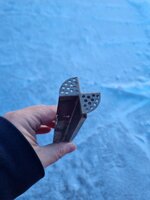
 
Hi,
do you mean these? If yes, i can give you the feedback :) I bought them few months ago and install them.
I must say that I was disappointed with the sound, because since they are homologated, the noise is defacto the same as the original. Friend of mine told me that they are maybe more silent than the originals.
As for the opening, it's not exactly a simple procedure and after some investigation I hesitated if I would not sell them and stay with the original.
But then i said let's give it a try....
The DB killer is in the shape of the Bmw logo and is very well welded into the tube using spot welds in 4 places. Of these, 2 points are inaccessible because they are hidden underneath the logo shaped lids. I tried to undo the first two visible welds, but the material is very hard.
It ended up destroying the logo, but even so I was not able to remove the Db killer because the remaining two welds were not within reach anyway. It was either not possible to get to them with a micro-cutter and a flexible extender.
I had to take off the decorative end caps, drill out about 10 welds around the circumference and carefully remove the bottom of the exhaust. Then I inserted a strong wire into the drilled holes and gradually pulled out the whole inside of the exhaust.
Then you need to take off the thermal wadding to get to the inner tube.
This tube however, is also welded to the bottom of the exhaust. With the first exhaust I managed to remove the tube and got to the welds of the Db killer. After drilling them I finally knocked out the killer with a piece of silon.
I couldn't do it with the second exhaust because the welder was bored probably and everything was welded with about a thousand welds. I have to found the places where the internal welds were, drilled holes against them and then drilled the inner welds out.
Then you have to put it all back together, which is the funniest part.....wrap the thermal wadding with aluminum strapping and reassemble the exhaust.
This was the hardest part, because after disassembly and reassembly, the volume of wadding grew and it was a problem to stuff everything back in. It took me almost five hours....
It is necessary to check the correct position of the inner part of the muffler and the cover, otherwise the decorative end caps will not be straight.
Eventually the two parts need to be put back together. Either weld them in place of the drilled holes, or like me, cut the edge and bend it inwards so that the inside doesn't fall out.
The first time I used the rivets, but I didn't realize that I couldn't fit a decorative cover because the heads exceeded the diameter.
So far I have chosen the cut and bend method so that I can open the exhaust again if necessary.
The sound has changed dramatically, it is beautifully deep and rumbling, but not annoying. Unfortunately there was no time to test it on the road due to the weather.

Was it worth it? I spent almost 3 days on it, defacto "destroyed" expensive branded exhausts and of course now they are not "street legal"...but they sounds good to me.

About the ''out of the box mufflers'' : they are very well made(yeah it's Akrapovic), personally I don't like the cover at the joint between the headers and the end cap, there is a big gap from above, the overall look on the motorcycle is decent and good.
I can add some pics and video with sound when i will be in garage.
Hope it can help you :)
 

Attachments

  • Akrapovic.jpg
    Akrapovic.jpg
    49.3 KB · Views: 17
Last edited:
Wow #PetrKunc, seems like it would have been easier and faster to make your own pipes. You certainly were committed to the project. We definitely need a video of the result. Cheers.
 
Hi there,
I wonder if drilling out the rear perforated mesh will help?
 

Attachments

  • IMG_2089.jpeg
    4 MB · Views: 7
  • IMG_2096.jpeg
    IMG_2096.jpeg
    2 MB · Views: 16
  • IMG_2106.jpeg
    3.4 MB · Views: 7
  • IMG_2105.jpeg
    IMG_2105.jpeg
    1.3 MB · Views: 14
  • IMG_2104.jpeg
    IMG_2104.jpeg
    1.1 MB · Views: 15
  • IMG_2103.jpeg
    IMG_2103.jpeg
    2.3 MB · Views: 17
  • IMG_2100.jpeg
    IMG_2100.jpeg
    2.2 MB · Views: 15
Hi,
do you mean these? If yes, i can give you the feedback :) I bought them few months ago and install them.
I must say that I was disappointed with the sound, because since they are homologated, the noise is defacto the same as the original. Friend of mine told me that they are maybe more silent than the originals.
As for the opening, it's not exactly a simple procedure and after some investigation I hesitated if I would not sell them and stay with the original.
But then i said let's give it a try....
The DB killer is in the shape of the Bmw logo and is very well welded into the tube using spot welds in 4 places. Of these, 2 points are inaccessible because they are hidden underneath the logo shaped lids. I tried to undo the first two visible welds, but the material is very hard.
It ended up destroying the logo, but even so I was not able to remove the Db killer because the remaining two welds were not within reach anyway. It was either not possible to get to them with a micro-cutter and a flexible extender.
I had to take off the decorative end caps, drill out about 10 welds around the circumference and carefully remove the bottom of the exhaust. Then I inserted a strong wire into the drilled holes and gradually pulled out the whole inside of the exhaust.
Then you need to take off the thermal wadding to get to the inner tube.
This tube however, is also welded to the bottom of the exhaust. With the first exhaust I managed to remove the tube and got to the welds of the Db killer. After drilling them I finally knocked out the killer with a piece of silon.
I couldn't do it with the second exhaust because the welder was bored probably and everything was welded with about a thousand welds. I have to found the places where the internal welds were, drilled holes against them and then drilled the inner welds out.
Then you have to put it all back together, which is the funniest part.....wrap the thermal wadding with aluminum strapping and reassemble the exhaust.
This was the hardest part, because after disassembly and reassembly, the volume of wadding grew and it was a problem to stuff everything back in. It took me almost five hours....
It is necessary to check the correct position of the inner part of the muffler and the cover, otherwise the decorative end caps will not be straight.
Eventually the two parts need to be put back together. Either weld them in place of the drilled holes, or like me, cut the edge and bend it inwards so that the inside doesn't fall out.
The first time I used the rivets, but I didn't realize that I couldn't fit a decorative cover because the heads exceeded the diameter.
So far I have chosen the cut and bend method so that I can open the exhaust again if necessary.
The sound has changed dramatically, it is beautifully deep and rumbling, but not annoying. Unfortunately there was no time to test it on the road due to the weather.

Was it worth it? I spent almost 3 days on it, defacto "destroyed" expensive branded exhausts and of course now they are not "street legal"...but they sounds good to me.

About the ''out of the box mufflers'' : they are very well made(yeah it's Akrapovic), personally I don't like the cover at the joint between the headers and the end cap, there is a big gap from above, the overall look on the motorcycle is decent and good.
I can add some pics and video with sound when i will be in garage.
Hope it can help you :)

Hi Petr

thank you very much for explaining your experience. I'll sum it up by saying 'there's no easy way'. :) As you said a high build quality component not designed to be deconstructed. As @Rufus said "A salutary lesson and a job not for the faint hearted."

As I said, and I think other members agree, a very well explained 'adventure' very much appreciated.

Regards
 
I wonder if drilling out the rear perforated mesh (I marked these places with a red arrow) will help?

Will drilling out these places make the sound better?
What do you think about it?
 

Attachments

  • IMG_2096.jpeg
    IMG_2096.jpeg
    1.9 MB · Views: 2,198
Yup, today evening i will be in my garage, i will post it here
Here it is. I drilled it out to get to the top internal welds, which are hidden under BMW ''logo'' and were very difficult to break off and some of them had to be drilled out at the end anyway. The welder did a good job and the material is very hard.
I have tried to twist the baffle, but the welds are really tight. The only way to remove the whole baffle is to really disassemble the exhaust.
The bottom welds (square faces with the drill hole in the photo) are defacto inaccessible due to the length of the baffle.
 

Attachments

  • baffle1.jpg
    baffle1.jpg
    144.2 KB · Views: 22
  • baffle2.jpg
    baffle2.jpg
    167.2 KB · Views: 20
  • baffle3.jpg
    baffle3.jpg
    182.9 KB · Views: 18
  • baffle4.jpg
    baffle4.jpg
    121.1 KB · Views: 21
Last edited:
Back
Top