Robodoc
New member
Has anyone installed the Vance and Hines slip ons on the R18B, and if so have you removed the baffles?
Follow along with the video below to see how to install our site as a web app on your home screen.
Note: This feature may not be available in some browsers.

and I'm assuming insulation? I admit I haven't looked yet. But I can't imagine that you can just remove the baffle without removing any insulation that is in there??Remove the end caps, there is a screw for each one that holds the baffle in, the top of the screw is tap welded and has to be grounded off, then you can remove the screw and baffle.
interesting, thank you very much!no insulation
Installed the Vance and Himes slip ons todayRemove the end caps, there is a screw for each one that holds the baffle in, the top of the screw is tap welded and has to be grounded off, then you can remove the screw and baffle
The internal screw is tack-welded. You need to grind that weld spot off.Installed the Vance and Himes slip ons today
Tried to remove end caps to get to the baffles to remove.
Could not get the internal screw to release.
Also the end caps wouldn't come off after removing the two external screws on the underside of the exhaust.
Help please!
I did that on my Freedom Performance mufflers, and have done the same with V&H mufflers on one of my Harleys years past. It made a big difference in tone on the R18 Freedom Performance exhaust. It's a little louder, too. My wife prefers it, if that countsI was able to grind off the welds holding the baffles in. Much deeper tone and a little more volume, but still pretty quiet. I’m not looking for obnoxious loud, but would like a bit more. Has anyone removed the fiberglass packing insert on the V&H? If so how do they sound?
")
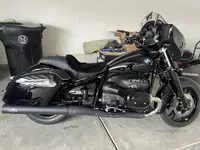
Hi the bike looks amazing with the V&H, did you painted the side covers ? Mine are all chromeYes I have put the Vance and Hines on my R18B and removed the baffles...it sounds great with out the baffles..


View attachment 10262
Finally got around to putting on the Vance and Hines. First some install notes:
1. The Stock exhaust comes off in 15 minutes. Remove brackets and all, they’re is an additional bracket for the Vance and Hines. Easy Peasy
2. Install the brackets loosely slip everything on, then tight the bracket and tap the exhaust in place with a rubber mallet. The whole job took me 90 minutes.
3. Ride the bike with the baffle in and record it from the back. The exhaust is a good distance behind the driver. It is not quiet, it does not sound like the fishtails, it does have some thump and it is very tasty and tasteful
4. I am not tasteful; I took it home and pulled the baffles
5. I am a V&H veteran; take some penetrating oil and spray the rim around the back. It facilitates removal and placement. Use a strap wrench and give them a good tug. They come right off. Vance and Hines shows this step in their install videos.
6. The ONLY cutting you should do is to remove the welded bolt that prevents the slip in baffle from working as designed for California compliance. Do NOT use a Dremel, use a serious oscillating cutter. Do this and the whole job takes half an hour.
7. Do NOT cut the welds that hold the baffle tube. This will facilitate removal of the packing and will cause a tinny reverb in the pipe. No. Vance and Hines knows what they’re doing. Just cut the baffle bolt. Vance and Hines designed the baffles for easy use.
8. Use a slide hammer to pop the baffles out, making this a 10 second job.
9. Align the screw hole neatly and pop back on. Done
10. Clean everything on the exhaust with alcohol
11. Wash your bike, cutting those bolts leaves metal dust everywhere. We don’t want scratches.
With the baffles out the bike is really loud and it sounds good. Under power it really sounds racy and has a nice thump at lower speeds. Without the baffles it is very loud