What did you do to your R18 today?

I levitaded my R18 with my handyness today.

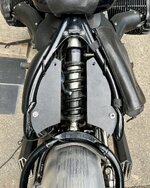
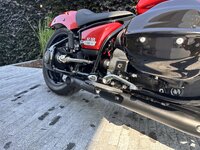
Next week I am hoping to become a "forking expert".... replacing the fork springs, oil and installing some YSS fork valves that I just recieved.... so I needed a way to raise the bike, steady it and lift and lower the front..... so.... just finished a rough'n ready lifter using mostly metal I had laying around. "The thing" lifts the rear wheel clear and stabilses the bike...... then use a trolley jack to lift front as required.

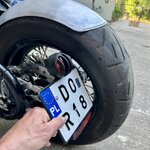
Always exciting when you first try and use a "great idea".... observing what you got wrong. JEEZ... it's a heavy bike.

20230602_114643.jpg
20230602_124407.jpg


I lay claim to no original ideas.... just cheapness.... with a dose of aussie "she'll be right".... What could possibly go wrong?

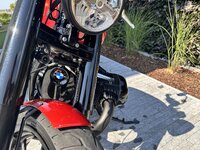
I've given it the name of "Boomerang R18 lift".... mostly because the R18 goes into the air.... and you can never be sure when it will return to earth..... possibly causing bodily harm.
 
Last edited:
today a short presentation of the progress of our Bobber conversion: R18 Doberman
1. We made "kidneys" covering the hole under the seat
2. We have already finished the rear lamp with license plate illumination. It is integrated in the license plate holder. Tomorrow we will only bring out the mounting bracket based on the original mounting points. The lamp will be available in two versions:
- with vertical accents to match our Heritage Exhaust
- a softer, smaller version
 

Attachments

  • IMG_3311.jpeg
    IMG_3311.jpeg
    389.1 KB · Views: 34
  • IMG_3309.jpeg
    IMG_3309.jpeg
    444.1 KB · Views: 34
  • IMG_3322 2.jpeg
    IMG_3322 2.jpeg
    315 KB · Views: 29
  • IMG_3321 2.jpeg
    IMG_3321 2.jpeg
    322.2 KB · Views: 27
  • IMG_3320 2.jpeg
    IMG_3320 2.jpeg
    311.8 KB · Views: 32
You mean match the exhaust made by Unikat Motorworks ?
yes, we are working with Unikat on this topic (we have known each other for years and we have a company in the same city :)
- but to be clear: the manufacturer of this exhaust is Unikat Motorworks (and we deliver the items to them and distribute them)
 
Last edited:
A photo from todays ride.... i think I have finally got the heel'n toe shifter sorted... took me 1,000km's and a month.

From this photo you can get an idea of what the +20mm Wilbers rear shock does to rear end looks..... and also 18mm spacers on Homage seat.

20230606_104312.jpg
 
Found an hour today whilst some bread was rising.... so thought I'd start doing my R18 forks (springs, oil and valves).... so being aware of how some have had issues with red thread locker on the top yoke fork caps I thought I'd see how it goes.

My plan was to put some heat into the bolt head using a largish soldering iron and have a go. I only had a mediumish iron.... but I did have some heat transfer paste from the 80's .... so used that.... anyway.... not a lot of heat in the end.... but both bolts came out easyish.... a bit of red on each one. I had a gas torch on standby if more heat was needed... but I'm sure I would have had collateral damage.... but sometimes just the threat of excessive force gets the bike to behave.

20230610_140859.jpg

20230610_140751.jpg


And.... given all the threadlock glue in this bike.... I invested in a thread clean up kit....

20230610_141056.jpg

Now onto the real work.

And.... a thanks to all those that had gone before... and posted about it.
 
Last edited:
Found an hour today whilst some bread was rising.... so thought I'd start doing my R18 forks (springs, oil and valves).... so being aware of how some have had issues with red thread locker on the top yoke fork caps I thought I'd see how it goes.

My plan was to put some heat into the bolt head using a largish soldering iron and have a go. I only had a mediumish iron.... but I did have some heat transfer paste from the 80's .... so used that.... anyway.... not a lot of heat in the end.... but both bolts came out easyish.... a bit of red on each one. I had a gas torch on standby if more heat was needed... but I'm sure I would have had collateral damage.... but sometimes just the threat of excessive force gets the bike to behave.

View attachment 10315

View attachment 10316


And.... given all the threadlock glue in this bike.... I invested in a thread clean up kit....

View attachment 10317

Now onto the real work.

And.... a thanks to all those that had gone before... and posted about it.
Great info to pass on. I wish I had seen it prior to the issue I had documented.
My concern at the time was heat transfer to any seals or O-rings.
I’m glad things went smoothly for you.
 
Installed prorace exhausts and reinstalled my innovv k3 (just front cam so didnt reinstall rear cam or the buttons, seems to work fine without those).
 

Attachments

  • IMG_1375.jpeg
    IMG_1375.jpeg
    3.5 MB · Views: 42
  • IMG_1374.jpeg
    IMG_1374.jpeg
    3.1 MB · Views: 42
Great info to pass on. I wish I had seen it prior to the issue I had documented.
My concern at the time was heat transfer to any seals or O-rings.
I’m glad things went smoothly for you.
Haha..... like you I had this today.....

20230611_133845.jpg


Normally A one minute unscrew .... that just kept on giving THIS TIME.... for quite some time.... luckily I don't charge myself per hour.....

I tried some heat (hot air gun on fork stanchion)... and needed a 2ft bar on the spanner for leverage and still struggled for a bit.

I did one fork today.... will find a few hours tomorrow to do the other.

20230611_144836.jpg 20230610_140929.jpg

The two 6mm damping rod compression holes became six 8mm.... and 2.5 turns preload on emulator spring and in went the Wilbers spring, 7.5w fork oil with 120mm air gap and cut 15mm off spacer (emulator thickness).... ànd no threadlocker on fork cap....haha.
 
Last edited:
Back
Top