- Joined
- Oct 16, 2020
- Messages
- 190
- Location
- Westminster, Maryland
- Bike
- 2001 R1200C, 2012 K1600GTL, 2021 R18 First Edition
- Moderator
- #1
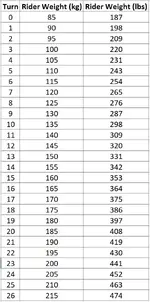
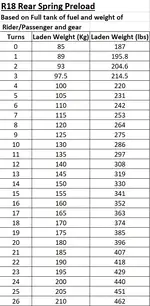
Many of the early reviews and many of the first customers have complained about the R18 having a very harsh ride and easily scraping the pegs. This is not indicative of a design flaw on the R18, but a procedural miss by BMW to properly document the unpacking and setup procedures for the customer. During shipping, the rear shock preload is placed in "Shipping" position. That means the adjustment of the rear shock is turned anti-clockwise until it hits the stop. In this position you are basically sitting on the rubber bump-stop on the shock with little to no spring action. During shipping it keeps the bike from bouncing around. The manual mentions setting the preload, but it appears that none of the dealers have been doing that. I have created a chart that gives a breakdown of preload from minimum adjustment (0 Turns) to Max Adjustment (26 Turns).
The process is very easy: With a 13mm 6-Point socket, turn the adjuster anti-clockwise until it stops. Slowly rotate the adjuster clockwise until you feel it engage the spring perch (you will feel slight resistance). This is position "0" Continue turning clockwise until you reach the desired preload based on the chart I created.
I hope this helps everyone out.
")
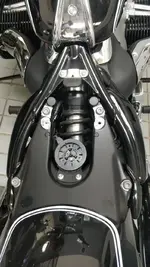
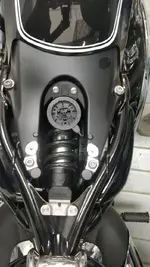

") I took off the seat to be able to peer at the mounting points .. i also thought the adjustments would be from that spot but thanks to Svtweb I learned it was on the side. My reason to peer at the mounting points ..... hoping to source a spring seat that may be able to mount directly onto those points and further wipe out any chances of shocks to the lower back.... but that still won't solve the issues with pillions ... that is unfortunately totally dependent on the shock adjustment and whether or not it can cope on the kinds of bumpy roads we have my nook of the woods. The Engine is GOLD ... gearbox is slick ... smoother on both counts than my 2017 GS ... engine and gearbox, but GS creams almost any bike on suspension so that's what I am focussing on with the R18. I have this demo for a day and am trying all the possible combinations of setting of rear shock I can before I hand it back today.
I took off the seat to be able to peer at the mounting points .. i also thought the adjustments would be from that spot but thanks to Svtweb I learned it was on the side. My reason to peer at the mounting points ..... hoping to source a spring seat that may be able to mount directly onto those points and further wipe out any chances of shocks to the lower back.... but that still won't solve the issues with pillions ... that is unfortunately totally dependent on the shock adjustment and whether or not it can cope on the kinds of bumpy roads we have my nook of the woods. The Engine is GOLD ... gearbox is slick ... smoother on both counts than my 2017 GS ... engine and gearbox, but GS creams almost any bike on suspension so that's what I am focussing on with the R18. I have this demo for a day and am trying all the possible combinations of setting of rear shock I can before I hand it back today.