Cornel
Member
Where did your order the replacement pins? I would love to get a spare.I think I remember hearing it drop out and pinging off the bike... I installed two new X518PIN and used blue loctite .. I'll keep an eye on it..
Follow along with the video below to see how to install our site as a web app on your home screen.
Note: This feature may not be available in some browsers.
Where did your order the replacement pins? I would love to get a spare.I think I remember hearing it drop out and pinging off the bike... I installed two new X518PIN and used blue loctite .. I'll keep an eye on it..
See the below link; you will want to order P/N X518PIN:Where did your order the replacement pins? I would love to get a spare.
Thank You!See the below link; you will want to order P/N X518PIN:
Product:
https://www.motorcycleparts-hornig....int-protection/Mounting-stand-rear-front.html
If you have any further questions please contact us again.
Mit freundlichen Grüßen,
Kind regards,
Ihr Hornig-Team
http://www.mhornig.de
Motorradzubehör Hornig GmbH
Gewerbepark Chammünster Nord C5
93413 Cham
Germany
Geschäftsführer: Hornig Helmut
Regensburg HRB 10330
Ust.Id.Nr. DE251397246
Tel: +49 (0)9971 99 66 10
Fax: +49 (0)9971 99 66 110
The shipping from Germany is expensive; however, my coupling PINs arrived within 2 days of placing the order.Thank You!
$23 plus shipping! I better not lose the one I have.
Your covers look great! Tell us your lessons learned re: valve adjustment. Am doing the same here shortly...Installed the Roland Sands Clutch & Brake fluid reservoir covers, added 50 mL of gear oil to my transmission case for a total of 1.2 L and.... attempted the Valve Adjustment maintenance..
View attachment 11145View attachment 11147View attachment 11148
View attachment 11149

Definitely need a long-narrow 14 mm spark-plug socket; I ordered the BMW part number socket, as well as a socket off of Amazon which Ulrich recommended within the valve adjustment thread. More to follow, once I attempt the job again..Your covers look great! Tell us your lessons learned re: valve adjustment. Am doing the same here shortly...
Good to know - thx!Definitely need a long-narrow 14 mm spark-plug socket; I ordered the BMW part number socket, as well as a socket off of Amazon which Ulrich recommended within the valve adjustment thread. More to follow, once I attempt the job again..


")
Just to understand ... you removed the flaps completely? or was the drilling in the exhaust? If you drilled out and removed the flaps ... did you weld the holes shut? ... sorry just trying to understand ... what you just did is on top of my list of things to do ...the servos removed and the flaps immobilized ... better completely removed.I drilled out the base of the muffler baffle tube and removed the exhaust servo. Demolished the two Diablo 1 3/8" hole saws in the process. If I could do it all over, I would have saved time and effort by just drilling a series of holes with a long 3/16"-3/8" drill bit and used a screwdriver to punch the thing out. Just take the chrome mid pipe guard off, loosen the clamp, pull the exhaust off, and shake out any metal chunks and shavings.
I recorded a before and after but I have a strong feeling the sound quality will do it any justice. Even took a quick ride around town with both of the slip-on mufflers removed. Resulting sound is definitely not as loud completely removing the mufflers, but does add a good bit of sound.
Hated the quiet nature of the stock R18 Classic pipes. With the servo delete leaving the butterflies open and the extra window in the exhaust, you can actually hear the damn thing.
Servo delete also give me better undercarriage access for lifting purposes.
Edit: might as well mention that I ordered two of the cheap amazon/ebay special crash bars (both styles) and one of the sissy bars. All together the items cost me less than 250 dollars. Should be a bit of fun testing.
Thanks ... now I get it. Much appreciated, I don't need to do the exhaust ... I went a different direction there ... Did you use 'Servo Buddies' and if yes where did you order them? ... I don't see them offered at the usual places I buy. Maybe if you have ... a model numberI guess you could say the flaps haven't been touched. I Just disconnected the servo electronic connectors, disconnected the wire assembly from the butterfly's cam, and verified the butterflies were in fact default open without the servos connected.
The exhaust was drilled from the very end of the exhaust system. Each muffler slip-on comes off simply. Just take off the chrome cover post-peg, and loosen a single clamp with a 13mm bolt.


ThanksI did not install the servo buddies. I just put some electrical tape over the plugs and tucked them up and out of the way. I plan on getting the gs-911 tool sometime between now (2500mi) and 6000mi. Not too concerned about the soft codes the lack of servos cause. It takes 3 bolts and 10 minutes of labor to put the servos back on if need be.
I am hoping to put a full exhaust on at some point next spring.
") ... just recently got a 911. stupidest place ever where BMW placed the plug (and how)! I just bought a 3 ft extension to the OBD2 interface. I will post it how I am going to run that into the saddle bags so I can use it when ever i want, without having to take that cover off and fiddle with that clamped on lid ... what-cha-ma-call-it and that little clip ...
... just recently got a 911. stupidest place ever where BMW placed the plug (and how)! I just bought a 3 ft extension to the OBD2 interface. I will post it how I am going to run that into the saddle bags so I can use it when ever i want, without having to take that cover off and fiddle with that clamped on lid ... what-cha-ma-call-it and that little clip ...She does look spick and spanI gave a detailed wash, claying, swirl/scratch removal, polishing, surface prep to remove previous chemicals and installed a ceramic finish. Total time between 6-7 hours. It was tougher to do than I thought it would be. I can see where I made some mistakes with high spots on the ceramic coating that I might address later but overall I’m happy I did it. The bike has 134 miles on it and I keep my bikes very clean so I wasn’t removing layers of crud. In hindsight I am not sure it was worth claying it. Everything else I’d do again. View attachment 11221
View attachment 11220

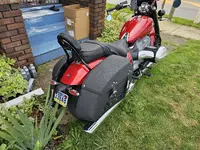
looking good there!$90 dollar sissy bar from Amazon. After an extra $14 for four longer 8mm bolts, install went smooth-ish. Needed a second set of hands to help hold things for a minute. It was a couple mimimeters too snug to the fender. Had to kinda flex the tubing of the backrest out a bit to get it over the fender.
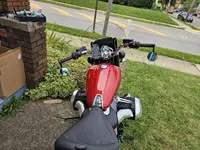
Also popped on a cheap set of bar end mirrors on while I was fiddling around with it.
The knockoff DK engine guard arrived a few days ago. I haven't installed it. The other engine guard should be here tomorrow. I will choose which to use when the other arrives.