Navigation
Install the app
How to install the app on iOS
Follow along with the video below to see how to install our site as a web app on your home screen.
Note: This feature may not be available in some browsers.
More options
Style variation
-
Welcome to the BMW R18 Forums. Member registration disables ads and allows you to post and share. Register Here.
You are using an out of date browser. It may not display this or other websites correctly.
You should upgrade or use an alternative browser.
You should upgrade or use an alternative browser.
Wunderkind Handlebar
- Discussion starter NAZMAN81
- Start date

Ulrich
Well-known member
- Joined
- Aug 18, 2022
- Messages
- 1,643
- Location
- Southern Oregon
- Bike
- BMW R18 FE / '66 Pan-Shovel
Would you have any pics taking the clutch side grip off? ... mine is a bit loose and I try to come up with a solution for hat
Ulrich
Well-known member
- Joined
- Aug 18, 2022
- Messages
- 1,643
- Location
- Southern Oregon
- Bike
- BMW R18 FE / '66 Pan-Shovel
Actually never mind ... I just checked again and the setscrew had backed out a bit .. all good ")
- Discussion starter
- #4
Glad to be of assistance 
I’m struggling with the last part of this install - drilling a hole through the handlebar. Any suggestions, tips or pointers are appreciated. I have basic tools
I’m struggling with the last part of this install - drilling a hole through the handlebar. Any suggestions, tips or pointers are appreciated. I have basic tools
D
Deleted member 1618
Guest
Center punch the surface of the handlebars in order to give the drill bit a purchase point; maybe use a uni-bit or stepper bit and gradually get to the diameter.Glad to be of assistance
I’m struggling with the last part of this install - drilling a hole through the handlebar. Any suggestions, tips or pointers are appreciated. I have basic tools
Ulrich
Well-known member
- Joined
- Aug 18, 2022
- Messages
- 1,643
- Location
- Southern Oregon
- Bike
- BMW R18 FE / '66 Pan-Shovel
^ ... what Scott said ... step-bits are great! ... but make sure to de-burr the inside of the hole ... to avoid nasty surprisesCenter punch the surface of the handlebars in order to give the drill bit a purchase point; maybe use a uni-bit or stepper bit and gradually get to the diameter.
- Discussion starter
- #7
I used my pocket knife and etched a cross over the spot. It worked but I should invest in a center punch for the future - thanks YouTube.Center punch the surface of the handlebars in order to give the drill bit a purchase point; maybe use a uni-bit or stepper bit and gradually get to the diameter.
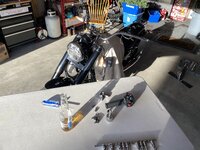
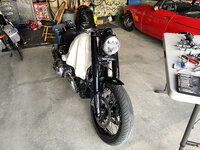
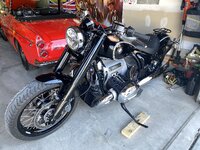
The install is complete however the brake and clutch lines that come with the kit are way too short. I had to make the original ones work.
Just need some V10 clutch fluid and a brake flush and I’m ready for a ride.


Attachments
215robert
Active member
Looks good, which are those the touring or the low?
- Discussion starter
- #9
Frenchie
Active member
nice Datsun Fairlady...;-)It’s the low. The riding position is a lot more sporty/leaned forward. I’ll attach a picture of how I made the original hydraulic and brake lines work.
Next is going to be the bigger wheels 21” front and 18” rear.
- Discussion starter
- #11
Thank you.nice Datsun Fairlady...;-)
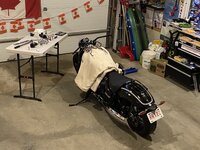
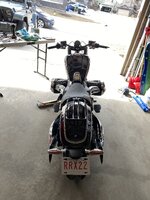
It’s definitely not a long range handlebar
Attachments

BeemeR18
New member
Any thoughts on the ride? I've got a similar kit but the riding position is significantly forward compared to stock so I'm not sure it will be comfortable on longer riders...Thank you.
It’s definitely not a long range handlebar
I’d love to install drag bars on mine but I’m looking for inspiration before committing. Thanks for sharing your struggles and hello from Ontario!
snider1970
Member
I have had the same kit sitting in my spare room for a few months awaiting the rest of my bobber conversion parts. So you are saying not to waste time undoing the brake and clutch lines? It's unfortunate the lines sent in the kit are too short, but if it saves time then why crack them open?It’s the low. The riding position is a lot more sporty/leaned forward. I’ll attach a picture of how I made the original hydraulic and brake lines work.
Next is going to be the bigger wheels 21” front and 18” rear.
alnytn
New member
Looks awesome !! Just picked one up and want to do a handlebar swap. What model handlebars did were they and can you explain how you did clutch fluid flush?I used my pocket knife and etched a cross over the spot. It worked but I should invest in a center punch for the future - thanks YouTube.
The install is complete however the brake and clutch lines that come with the kit are way too short. I had to make the original ones work.
Just need some V10 clutch fluid and a brake flush and I’m ready for a ride.
BAD MIKE USA
Active member
- Joined
- May 15, 2025
- Messages
- 143
- Location
- New Salem, MA, USA
- Bike
- 2021 BMW R18 CLASSIC, DARK NOMAD, FE, 2019 HONDA CRF450L
I have the wunderkind touring version of those bars, black, with the headlight and speedo lowering kit and low handle bar mounts in black. Not installed yet. Going to keep the auxiliary lights, not sure about keeping the shorty windshield. Kit came with lines. Replacing the BMW PRO bars that came on the bike new.

snider1970
Member
After installing these on my bike I found the included lines were not too short but needed to be adjusted. The directions are on the packaging including a needed tool. They are not a straight out of the box fitment.It’s the low. The riding position is a lot more sporty/leaned forward. I’ll attach a picture of how I made the original hydraulic and brake lines work.
Next is going to be the bigger wheels 21” front and 18” rear.